
Almond-shaped nails are widely loved for their natural length and elegant curves. Whether for daily hand care or formal nail art, they can instantly enhance the look of your hands. However, to create perfectly almond-shaped nails, manual nail files often fail to achieve the desired effect, which is where a nail drill becomes an indispensable tool. By correctly selecting the drill type, controlling the rotation speed and pressure, and using scientific filing techniques, you can create professional-looking almond-shaped nails even at home.

Why choose a nail drill to create an almond shape?
While traditional manual nail files are convenient, they are inefficient and prone to producing uneven edges when dealing with long nails, cuticles, or delicate contours. Nail drills use high-speed rotating drill bits to cut or buff, quickly shaping, removing dead skin, and smoothing the nail surface, while reducing the risk of nail breakage caused by excessive manual friction.
Nail drill features include rotation speed (RPM), torque, and drill bit type. For general home use, a low speed of 5,000–15,000 RPM is recommended, offering both safety and efficiency. Professional nail salons typically use a high speed of 20,000–30,000 RPM to handle complex designs or gel nail treatments. The drill bit material is also crucial for professional operation. Tungsten carbide drill bits are hard and wear-resistant, suitable for shaping hard nails or gel nail surfaces; ceramic drill bits have a smooth surface and low thermal conductivity, making them better suited for exfoliation or fine buffing.
I once tried to create almond-shaped nails with a manual file, and even after half an hour, I still couldn’t guarantee symmetry between my hands. Later, I used a nail drill, and I could create a uniform almond shape in less than 15 minutes, which made me fall in love with it completely.
Basic preparations before polishing
Before using a nail drill, proper nail preparation is crucial. First, thoroughly clean your nails to remove old nail polish, dead skin cells, and dust. Then, perform a preliminary trim to achieve a suitable length. Overly long or uneven nails will affect the creation of the almond-shaped profile.
In professional nail art, a coarse-grit drill bit (80–150 grit) is typically used first to remove unevenness or the gel layer from the nail surface, followed by a medium-grit drill bit (180–240 grit) to shape the sides of the nail. When filing, it’s recommended to maintain an approximately 45° angle between the drill bit and the nail surface to ensure even pressure and a smooth cut. The rotation direction is usually in the same direction as nail growth to reduce the risk of splitting or breakage.
When doing this at home, I usually first use a fine-grit file to gently trim the length and then use a nail drill for fine shaping. This protects my nails and makes it easy to achieve a standard almond shape.
Almond-shaped nail edge buffing techniques
The key to an almond-shaped nail is a slight narrowing at the sides and a rounded tip. Using a medium or fine abrasive drill bit, gently buff from the sides of the nail, controlling the angle and rotation speed to gradually create an elegant curve at the tip. The tip can be finished with an ultra-fine drill bit (320–400 grit) to make it smooth and rounded.
The following professional details should be noted during operation:
Pressure control: Excessive pressure can easily lead to thin or broken nail edges; insufficient pressure will prevent the formation of an ideal curve.
Drill bit selection: Coarse-grind drill bits are suitable for grinding long and large contours, while fine-grind drill bits are suitable for trimming edges and polishing.
Rotation speed: High speed is suitable for removing hard layers or gel nails, but the speed should be reduced when buffing cuticles or thin nails to avoid overheating.
I remember the first time I filed almond-shaped nails for a friend; the edges on her left hand were too narrow, while those on her right were slightly straight. By adjusting the drill bit angle and controlling the pressure, both fingertips eventually achieved a natural and smooth curve.
Nail surface buffing and polishing
Almond-shaped nails not only need to be aesthetically pleasing, but a smooth surface is equally important. An uneven surface will affect the color application and may also increase the likelihood of bubbles appearing on gel nails or regular nail polish. Professional nail technicians typically use a drill bit with a grit of 240–400 to lightly buff the nail surface and then use a buffer strip or buffing drill bit to create a smooth and even base layer.
When I do my nail polish at home, I usually use an ultra-fine drill bit to gently buff the tips and edges of my nails and then use a buffing strip to polish the entire nail surface. Even when applying regular nail polish, it produces a smooth, professional finish.
Disinfection and storage of nail drills
Drill bits must be disinfected after each use to prevent cross-contamination of bacteria. Common methods include alcohol disinfection and ultraviolet (UV) disinfection. Alcohol disinfection is simple and convenient; simply immerse the drill bit in 70%–75% alcohol for several minutes, then let it air dry. UV disinfection is suitable for professional nail salons that use drill bits frequently and is safer for ceramic and tungsten carbide drill bits, as it will not cause surface abrasion.
For storage, it is recommended to use a storage box with independent holes or buffer compartments, placing each drill bit separately to avoid collisions and dust accumulation. High-humidity environments increase the risk of oxidation of metal drill bits, so a dry, well-ventilated storage environment should be chosen, and the wear of drill bits should be checked regularly, with consumable drill bits replaced promptly.
Combine nail drill with light-cured or gel nail art
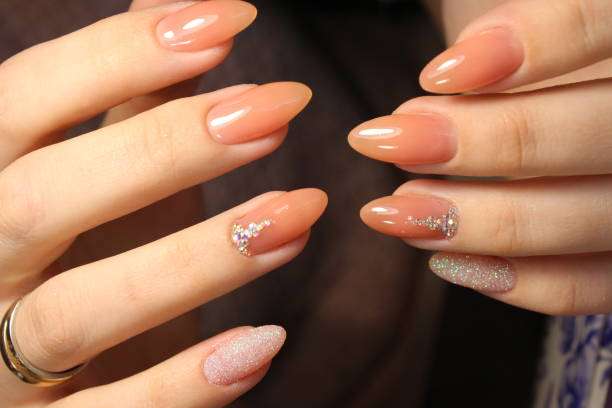
After basic buffing of almond-shaped nails, if you’re going for gel or varnish manicures, a nail drill can help remove old nail polish or buff the gel layer, allowing the new nail layer to adhere more firmly. At the same time, cleaning before and after buffing can prevent air bubbles and peeling, improving the quality and durability of the manicure.
At my nail salon, a customer wanted light pink gel almond-shaped nails. I first used a nail drill to remove the old nail layer, then shaped and smoothed them, and finally applied the color. After it was finished, she said, “The shape and shine of my nails are perfect this time!” This is why I think mastering professional nail drill techniques is very worthwhile.
Summarize
Nail drills not only improve the efficiency of shaping almond-shaped nails but also make the entire nail art process more professional and precise. Mastering professional techniques such as drill bit selection, speed control, pressure techniques, surface polishing, and sterilization and storage are essential skills for every nail art enthusiast or nail technician.
At the same time, maintaining a relaxed mindset and practicing patiently is also important. Each time you create a perfectly almond-shaped nail and see your fingertips flowing elegantly, you’ll always feel a small sense of accomplishment. Whether for home use or professional salon procedures, a nail drill is an indispensable partner.
Do you also want to own a nail drill? Click to see our selection of nail drills!